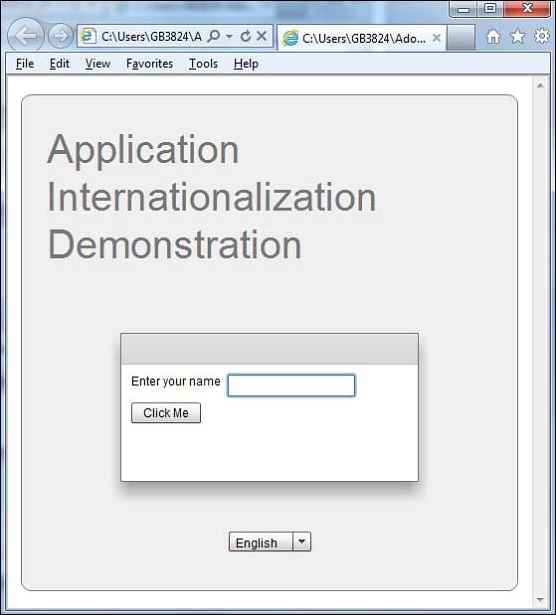
Flex提供了兩種國際化Flex應用程式的方法,我們將演示編譯時國際化在項目中最常用的用法。
| Sr.No | Technique & Description |
|---|---|
| 1 | 編譯時國際化 這種技術是最流行的,運行時只需要很少的開銷;是轉換常量和參數化字符串的非常有效的技術;實現起來最簡單。編譯時國際化使用標準屬性文件存儲轉換的字符串和參數化消息,這些屬性文件直接在應用程式中編譯。 |
| 2 | 運行時國際化 這種技術非常靈活,但比靜態字符串國際化慢。您需要分別編譯本地化屬性文件,將它們放在應用程式外部,並在運行時加載它們。 |
Workflow of internationalizing a Flex Application
Step 1 – Create folder structure
在Flex項目的src文件夾下創建一個區域設置文件夾。這將是應用程式將支持的區域設置的所有屬性文件的父目錄。在locale文件夾中,創建子文件夾,每個文件夾對應一個要支持的應用程式的locale。命名區域設置的約定是
{language}_{country code}
例如,英語代表美國英語。deu de地區代表德語。示例應用程式將支持兩種常用語言:英語和德語。
Step 2 – Create properties files
創建包含要在應用程式中使用的消息的屬性文件。在我們的示例中,我們在src>locale>en_US文件夾下創建了一個HelloWorldMessages.properties文件。
enterName = Enter your name
clickMe = Click Me
applicationTitle = Application Internationalization Demonstration
greeting = Hello {0}
創建包含特定於區域設置的翻譯值的屬性文件。在我們的示例中,我們在src>locale>de\u de文件夾下創建了一個HelloWorldMessages.properties文件。此文件包含德語翻譯。_de指定德語區域設置,我們將在應用程式中支持德語。
如果要使用Flash Builder創建屬性文件,請將文件編碼更改爲UTF-8。選擇該文件,然後右鍵單擊該文件以打開其屬性窗口。選擇文本文件編碼爲其他UTF-8。應用並保存更改。
enterName = Geben Sie Ihren Namen
clickMe = Klick mich
applicationTitle = Anwendung Internationalisierung Demonstration
greeting = Hallo {0}
Step 3 – Specify Compiler options
右鍵單擊項目並選擇「屬性」。
選擇Flex Compiler,並將以下內容添加到其他編譯器參數設置中−
-locale en_US de_DE
右鍵單擊項目並選擇「屬性」。
選擇Flex Build Path,並將以下內容添加到源路徑設置中−
src\locale\{locale}
Internalization Example
現在讓我們按照以下步驟來測試Flex應用程式中的內化技術;
| Step | Description |
|---|---|
| 1 | Create a project with a name HelloWorld under a package com.tutorialspoint.client as explained in the Flex - Create Application chapter. |
| 2 | Modify HelloWorld.mxml as explained below. Keep rest of the files unchanged. |
| 3 | Compile and run the application to make sure business logic is working as per the requirements. |
<?xml version = "1.0" encoding = "utf-8"?>
   <s:Application xmlns:fx = "http://ns.adobe.com/mxml/2009"
   xmlns:s = "library://ns.adobe.com/flex/spark"
   xmlns:mx = "library://ns.adobe.com/flex/mx"
   minWidth = "500" minHeight = "500">

   <fx:Metadata>
      [ResourceBundle("HelloWorldMessages")]
   </fx:Metadata>

   <fx:Style source = "/com/tutorialspoint/client/Style.css" />
   <fx:Script>
      <![CDATA[
         import mx.controls.Alert;
         [Bindable]
         private var locales:Array =  [{label:"English", locale:"en_US"},
            {label:"German", locale:"de_DE"}];

         private function comboChangeHandler():void {
           resourceManager.localeChain = [localeComboBox.selectedItem.locale];
         }

         protected function clickMe_clickHandler(event:MouseEvent):void {
            var name:String = txtName.text;
            var inputArray:Array = new Array();
            inputArray.push(name);
            Alert.show(resourceManager.getString('HelloWorldMessages'
               ,'greeting',inputArray));
         }
      ]]>
   </fx:Script>

   <s:BorderContainer width = "500" height = "500" id = "mainContainer"
      styleName = "container">
      <s:VGroup width = "100%" height = "100%" gap = "50"
	  horizontalAlign = "center" verticalAlign = "middle">

         <s:Label id = "lblHeader" fontSize = "40"
            color = "0x777777"
            text  = "{resourceManager.getString('HelloWorldMessages','applicationTitle')}"
            styleName = "heading" width = "90%" height = "150" />

         <s:Panel width = "300" height = "150">
            <s:layout>
               <s:VerticalLayout paddingTop = "10" paddingLeft = "10" />
            </s:layout>

            <s:HGroup >
               <s:Label text = "{resourceManager.getString('HelloWorldMessages','enterName')}"
                  paddingTop = "2" />
               <s:TextInput id = "txtName" />
            </s:HGroup>

            <s:Button
               label = "{resourceManager.getString('HelloWorldMessages','clickMe')}"
               click = "clickMe_clickHandler(event)" right = "10" />
         </s:Panel>

         <mx:ComboBox id = "localeComboBox" dataProvider = "{locales}"
            change = "comboChangeHandler()" />
      </s:VGroup>
   </s:BorderContainer>
</s:Application>
完成所有更改後,讓我們以正常模式編譯並運行應用程式,就像我們在flex-create application一章中所做的那樣。如果您的應用程式一切正常,它將產生以下結果:[聯機試用]

使用語言更改語言下拉列表並查看結果。