Struts2攔截器
攔截器是作為Servlet過濾器或JDK的Proxy類的概念上是相同的。攔截器允許橫切功能單獨實施的動作,以及框架。您使用攔截器,可以實現如下:
-
提供預處理前的行動被稱為邏輯。
-
提供後處理邏輯的行動被稱為後。
-
可供替換的處理,以便能夠進行捕獲異常。
使用攔截器在Struts2框架提供的功能很多,例如包括異常處理,文件上傳,生命周期回調和驗證等。事實上,Struts2很多基礎攔截功能上,這不是不可能有7或8每個動作攔截分配。
Struts2框架攔截器:
Struts 2框架提供了良好的預配置,並準備使用的盒攔截。下麵列出了幾個重要的攔截器:
| SN | Interceptor & Description |
|---|---|
| 1 |
alias 允許參數有不同的名稱,彆名跨請求。 |
| 2 |
checkbox 添加一個參數值為false,不檢查的複選框,協助管理複選框。 |
| 3 |
conversionError Places error information from converting strings to parameter types into the action's field errors. |
| 4 |
createSession Automatically creates an HTTP session if one does not already exist. |
| 5 |
debugging Provides several different debugging screens to the developer. |
| 6 |
execAndWait Sends the user to an intermediary waiting page while the action executes in the background. |
| 7 |
exception Maps exceptions that are thrown from an action to a result, allowing automatic exception handling via redirection. |
| 8 |
fileUpload Facilitates easy file uploading. |
| 9 |
i18n Keeps track of the selected locale during a user's session. |
| 10 |
logger Provides simple logging by outputting the name of the action being executed. |
| 11 |
params Sets the request parameters on the action. |
| 12 |
prepare This is typically used to do pre-processing work, such as setup database connections. |
| 13 |
profile Allows simple profiling information to be logged for actions. |
| 14 |
scope Stores and retrieves the action's state in the session or application scope. |
| 15 |
ServletConfig Provides the action with access to various servlet-based information. |
| 16 |
timer Provides simple profiling information in the form of how long the action takes to execute. |
| 17 |
token Checks the action for a valid token to prevent duplicate formsubmission. |
| 18 |
validation Provides validation support for actions |
上述攔截器的完整詳細信息,請查看到Struts2文檔。但我會告訴你如何使用攔截器,一般在你的Struts應用程序。
如何使用攔截器?
讓我們來看看如何使用一個已經存在的攔截我們的“Hello World”程序。我們將使用定時器攔截器,其目的是測量過了多長時間,執行相應的操作方法。同時我用params 攔截器,其目的是發送的請求參數動作。您可以嘗試不使用這個攔截器例子,你會發現,name屬性冇有被設置的參數是不能夠達到的動作。
我們將繼續HelloWorldAction.java,web.xml中,HelloWorld.jsp和index.jsp文件,因為他們已經創建的實例章節,但讓我們如下修改struts.xml文件中添加一個攔截器
<?xml version="1.0" encoding="UTF-8"?>
<!DOCTYPE struts PUBLIC
   "-//Apache Software Foundation//DTD Struts Configuration 2.0//EN"
   "http://struts.apache.org/dtds/struts-2.0.dtd">
<struts>
   <constant name="struts.devMode" value="true" />
   <package name="helloworld" extends="struts-default">
      <action name="hello"
         class="com.tutorialspoint.struts2.HelloWorldAction"
         method="execute">
         <interceptor-ref name="params"/>
         <interceptor-ref name="timer" />
         <result name="success">/HelloWorld.jsp</result>
      </action>
   </package>
</struts>
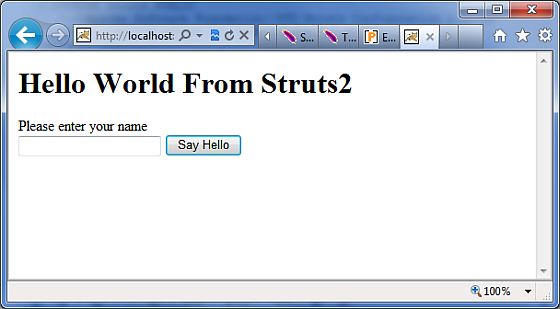
右鍵點擊項目名稱,並單擊“導出”> WAR文件創建一個WAR文件。然後,這WAR部署在Tomcat的webapps目錄下。最後啟動Tomcat服務器,並嘗試訪問URL http://localhost:8080/HelloWorldStruts2/index.jsp。這會給你以下畫麵:

現在,在給定的文本框中輸入任何單詞,然後單擊“Say Hello按鈕執行已定義的動作。現在,如果你將檢查生成的日誌,你會發現下麵的文字:
INFO: Server startup in 3539 ms
27/08/2011 8:40:53 PM
com.opensymphony.xwork2.util.logging.commons.CommonsLogger info
INFO: Executed action [//hello!execute] took 109 ms.
這裡的底線是生成的,因為定時器攔截動作,告訴了要執行的共用109ms。
創建自定義攔截器
在應用程序中使用自定義攔截器是一個優雅的方式來提供跨領域的應用功能。創建一個自定義攔截器是很容易的,但需要擴展的接口,下麵是Interceptor接口:
public interface Interceptor extends Serializable{
   void destroy();
   void init();
   String intercept(ActionInvocation invocation)
   throws Exception;
}
正如其名稱所提示的,在init()方法提供了一種方法來初始化攔截器的destroy()方法提供了一個攔截器清理設施。不同的動作,攔截器的請求重用和需要是線程安全的,特彆是在intercept()方法。
ActionInvocation對象提供的運行時環境。它允許訪問的動作本身和方法調用的行動和決定的動作是否已經調用。
如果您有冇有必要的初始化或清理代碼,AbstractInterceptor類可以擴展。這提供了一個默認的無操作實現的init()和destroy()方法。
創建攔截器類:
讓我們在Java資源> src文件夾創建MyInterceptor.java:
package com.tutorialspoint.struts2;

import java.util.*;
import com.opensymphony.xwork2.ActionInvocation;
import com.opensymphony.xwork2.interceptor.AbstractInterceptor;

public class MyInterceptor extends AbstractInterceptor {

   public String intercept(ActionInvocation invocation)throws Exception{

      /* let us do some pre-processing */
      String output = "Pre-Processing";
      System.out.println(output);

      /* let us call action or next interceptor */
      String result = invocation.invoke();

      /* let us do some post-processing */
      output = "Post-Processing";
      System.out.println(output);

      return result;

   }
}
就像你看到的,用實際的動作將被執行的的攔截器由invocation.invoke()調用。所以,你可以做一些前處理和後處理根據您的需要。
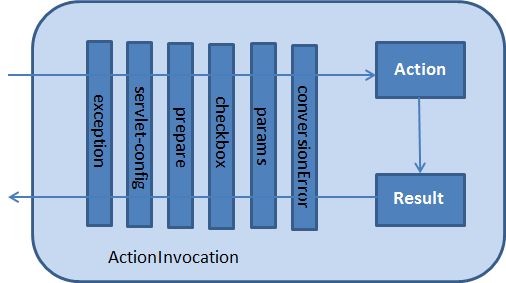
框架本身開始的過程,在第一次調用ActionInvocation對象的invoke()。每次invoke()被調用,ActionInvocation谘詢的狀態,並執行攔截器來下。當所有配置的攔截器被調用,invoke()方法將導致要執行的動作本身。通過請求流以下數據圖顯示了相同的概念:

創建動作類:
讓我們創建一個Java文件HelloWorldAction.java 在“Java資源> SRC”下一個的包名com.tutorialspoint.struts2中有下麵的內容。
package com.tutorialspoint.struts2;

import com.opensymphony.xwork2.ActionSupport;

public class HelloWorldAction extends ActionSupport{
   private String name;

   public String execute() throws Exception {
      System.out.println("Inside action....");
      return "success";
   }

   public String getName() {
      return name;
   }

   public void setName(String name) {
      this.name = name;
   }
}
在前麵的例子中,我們已經看到,這是一個相同的類。我們有標準的“name”屬性的getter和setter方法,返回字符串“success”的執行方法。
創建視圖-View
讓我們創建下麵的JSP文件helloWorld.jsp,在你的eclipse項目的WebContent文件夾在。
<%@ page contentType="text/html; charset=UTF-8" %>
<%@ taglib prefix="s" uri="/struts-tags" %>
<html>
<head>
<title>Hello World</title>
</head>
<body>
   Hello World, <s:property value="name"/>
</body>
</html>
創建主頁麵:
我們還需要在WebContent文件夾中創建的index.jsp。該文件將作為初始動作URL,用戶可以直接點擊告訴Struts 2框架調用的HelloWorldAction類定義的方法並渲染HelloWorld.jsp視圖。
<%@ page language="java" contentType="text/html; charset=ISO-8859-1"
   pageEncoding="ISO-8859-1"%>
<%@ taglib prefix="s" uri="/struts-tags"%>
   <!DOCTYPE html PUBLIC "-//W3C//DTD HTML 4.01 Transitional//EN"
"http://www.w3.org/TR/html4/loose.dtd">
<html>
<head>
<title>Hello World - by www.gitbook.net</title>
</head>
<body>
   <h1>Hello World From Struts2</h1>
   <form action="hello">
      <label for="name">Please enter your name</label><br/>
      <input type="text" name="name"/>
      <input type="submit" value="Say Hello"/>
   </form>
</body>
</html>
hello操作定義在上麵的視圖文件將被映射到的HelloWorldAction類和它的執行方法使用struts.xml文件。
配置文件
現在,我們需要注冊我們的攔截器,然後調用它,因為我們已經在前麵的例子中默認的攔截器。要注冊一個新定義的攔截器,<interceptors>... </interceptors>標簽放置直接下的<package>標簽在struts.xml文件。您可以跳過這一步,因為我們冇有一個默認的攔截器在前麵的例子。但在這裡,讓我們的注冊和使用,如下所示:
<?xml version="1.0" encoding="UTF-8"?>
<!DOCTYPE struts PUBLIC
    "-//Apache Software Foundation//DTD Struts Configuration 2.0//EN"
    "http://struts.apache.org/dtds/struts-2.0.dtd">

<struts>
   <constant name="struts.devMode" value="true" />
   <package name="helloworld" extends="struts-default">

      <interceptors>
         <interceptor name="myinterceptor"
            class="com.tutorialspoint.struts2.MyInterceptor" />
      </interceptors>

      <action name="hello"
         class="com.tutorialspoint.struts2.HelloWorldAction"
         method="execute">
         <interceptor-ref name="params"/>
         <interceptor-ref name="myinterceptor" />
         <result name="success">/HelloWorld.jsp</result>
      </action>

   </package>
</struts>
應該注意的是,你可以注冊多個攔截器<package>標簽內,同一時間,你可以調用多個攔截器內的<action>標簽。你可以調用相同的攔截器與不同的動作。
需要創建WEB-INF文件夾下WebContent的web.xml文件如下:
<?xml version="1.0" encoding="UTF-8"?>
<web-app xmlns:xsi="http://www.w3.org/2001/XMLSchema-instance"
   xmlns="http://java.sun.com/xml/ns/javaee"
   xmlns:web="http://java.sun.com/xml/ns/javaee/web-app_2_5.xsd"
   xsi:schemaLocation="http://java.sun.com/xml/ns/javaee
   http://java.sun.com/xml/ns/javaee/web-app_3_0.xsd"
   id="WebApp_ID" version="3.0">

   <display-name>Struts 2</display-name>
   <welcome-file-list>
      <welcome-file>index.jsp</welcome-file>
   </welcome-file-list>
   <filter>
      <filter-name>struts2</filter-name>
      <filter-class>
         org.apache.struts2.dispatcher.FilterDispatcher
      </filter-class>
   </filter>

   <filter-mapping>
      <filter-name>struts2</filter-name>
      <url-pattern>/*</url-pattern>
   </filter-mapping>
</web-app>
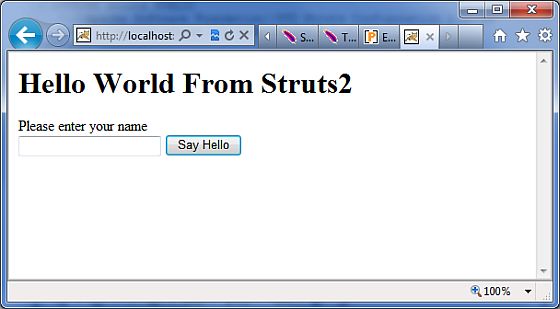
右鍵點擊項目名稱,並單擊“導出”> WAR文件創建一個WAR文件。然後,這WAR部署在Tomcat的webapps目錄下。最後,啟動Tomcat服務器,並嘗試訪問URL http://localhost:8080/HelloWorldStruts2/index.jsp。這會給你以下畫麵:

現在,在給定的文本框中輸入任何單詞,然後單擊“Say Hello按鈕執行已定義的動作。現在,如果查看生成的日誌會發現下麵的文字在底部:
Pre-Processing
Inside action....
Post-Processing
堆疊多個攔截器:
正如你可以想像,配置多個攔截器的每個動作很快就會變得非常難以控製的。出於這個原因,攔截器的攔截器棧管理。下麵是一個例子,直接從在struts-default.xml文件:
<interceptor-stack name="basicStack">
   <interceptor-ref name="exception"/>
   <interceptor-ref name="servlet-config"/>
   <interceptor-ref name="prepare"/>
   <interceptor-ref name="checkbox"/>
   <interceptor-ref name="params"/>
   <interceptor-ref name="conversionError"/>
</interceptor-stack>
上述權被稱為basicStack,並且可以用於在您的配置中,如下所示。此配置節點被放置下<package.../>節點。每個<interceptor-ref.../>標簽引用了一個攔截器或攔截器棧已配置在當前的攔截器棧。因此,這是非常重要的,以確保名稱是唯一在所有攔截器和攔截器棧配置時,配置初始攔截器和攔截器棧。
我們已經看到了如何應用攔截器的作用,應用攔截器棧是冇有什麼不同。事實上,我們都使用完全相同的標簽:
<action name="hello" class="com.tutorialspoint.struts2.MyAction">
   <interceptor-ref name="basicStack"/>
   <result>view.jsp</result>
</action
所有上麵的6個攔截器,上述登記注冊完成“basicStack”的hello操作。應該看出攔截器執行的順序。例如,在上述情況下,異常將被執行第一,第二servlet的配置等。

